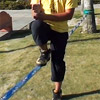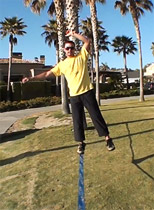
Have you already bought your first line and set it up? Then it is time to learn how to walk it! We'll present you an effective technique to learn slacklining as quickly as possible, and also some helpful related tips.
Positive Approach
Learning a new skill is always difficult at first – but don't worry! Remember learning how to ride a bike? Very frustrating in the beginning but really easy after some practice. And it's the same with slacklining.
So think positively, stay relaxed and have fun. Keep on trying and you will succeed – patience is the key.
With or Without Shoes?
Mostly it is better to start barefoot as you'll get better contact with the line and learn faster. However, as you gain more skill and begin trying various tricks and stunts, you would probably switch to shoes to protect your feet when landing (also, wearing shoes becomes a necessity when the ground is not safe for landing barefoot).
When using shoes, tie the laces tightly so your feet don't wobble in them. Also check the sole for any stuck sharp rock pieces – they can damage the line.
VideoProbably the best training video comes from Gibbon athlete Frankie Najera, enjoy ;)
Slacklining Tips: How to Slackline || REI
|
Detailed Explanation:
However, it may be difficult to remember all of the steps shown in the video. So I am going to provide you with a step-by-step guide, add pictures and also some tips not mentioned by Frankie. Let's start ;)
1. Learn How to Balance
Frankie suggests to learn how to balance on the line prior to taking your first steps on it – and I agree. If you try walking on the line right away, most probably you'll end up with few hasty steps and then fall off. Just balancing on one leg is easier as you can use the other to leg to help you keep balance. So:

- Position yourself near the middle of the slackline and place one foot on it – inline, not across.
- Do not press against the line as it will start wobbling – rather keep your leg relaxed.

- Do not look under you feet, focus rather on a single point in front of you, for example the anchor of the line or something on the tree – this will help you a lot with keeping balance.
- Raise your arms over your head and start
Practise your balance on one leg, count to 20 for example and then switch your legs. While doing so, keep the basic slacklining position:
- Bend your knees slightly to lower your center of gravity and absorb the vibrations of the line. Don't worry, everyone wobbles when starting – after some practice your muscles will deal with it.
- Keep your arms overhead, with elbows above your shoulders – do not wave them around your body and don't put them straight out to the sides. You don`t have any pole like tightrope walkers, the key is to shift weight to the sides with your arms (and leg when balancing).
- Keep your back straight (or even lean back a little) – when you bend forward, you'll tend to fall and make hasty, uncertain steps.
- As already mentioned, focus on something in front of you. Do not look under your feet.
2. Learn How to Walk a Slackline
Once you learn how to keep balance on the slackline, try your first steps. Again, stay in the basic position described above.
Plus there are few more tips:
- Walk with your feet straight on the line (not across) and your hips, chest and head straight against the anchor. Don't worry, you will develop other styles of walking and jumping later on ;)
- When the line starts swinging, try lowering your center of gravity even more to stabilize your body.
- Don't run, take your time and enjoy the new type of movement you are just learning.
- Even if you lose the balance, try to stay on the line as long as possible before you fall – that helps developing your muscles and skills as soon as possible.
- And if you still experience problems, ask a friend to walk with you and give you a helping hand (that's useful particularly for kids). Another option is to have someone sitting on the other side of the line – it will make it more stable. Or if you have a more experienced slackliner nearby, you can try this cool method by Sam Volery:
3. What next?
Congratulations! You've just mastered the first slacklining skill – balancing and walking. But just walking the line again and again will become boring after some time – so what are the other possibilities?
- Start with basic tricks as soon as possible – turning around, walking backwards, jump start and others. Your skills will improve much faster and you'll quickly fell in love with tricklining.
- Another option is Longlining – walking a line longer than 30 meters (98 ft). You'll need a special equipment, however, it will open a whole new world of slacklining possibilities you can enjoy.
- And you can even progress into Highlining – balancing on a line high above the ground, set up between two rocks or buildings.
And remember, slacklining is a social sport! So join some group in your area, or found a new one with your friends – you can get the best experience, knowledge and tips during slackline sessions with your friends on the line ;)


Do you have a recommendation for the length of the line for a beginner?
06.08.15 at 12:23 am
Hi Chris, most beginner slackline kits are 50ft long which is completely enough. The question is if it’s enough for your needs or if you plan some longer walks in the future (so getting the 85ft length would be better – you can always set it up shorter if you want). You can also learn more at http://slackline.hivefly.com/best-slackline-for-beginners/
06.08.15 at 8:56 am